|
Scaffold Safety
The next time you have to work up high, consider renting scaffolding rather
than struggling with ladders. Scaffolding provides a large, stable work platform
where you can stack materials and set up your tools. With scaffolding, you
can easily reach all areas of the repair to do a better job in half the time.
And you’ll save tons of time and energy by not constantly climbing up
and down to reposition your ladder.
Guard rails attached to the top of the scaffold frames allow you to concentrate
on the task at hand without worrying about falling. We’ll show you how
to set up your rented scaffolding so it’s safe and secure and then show
you a few of the home-repair jobs where scaffolding really shines.
Rent Scaffolding For Those High Jobs
The frame scaffolds we’re using (sometimes referred to as “pipe-scaffold”)
are perfect for exterior work and are available at most full-service rental
centers. Also check the Yellow Pages under “Scaffolds, Rental” for
businesses that specialize in scaffolding rental and sales. You’ll usually
get lower rates and expert advice from these specialists.
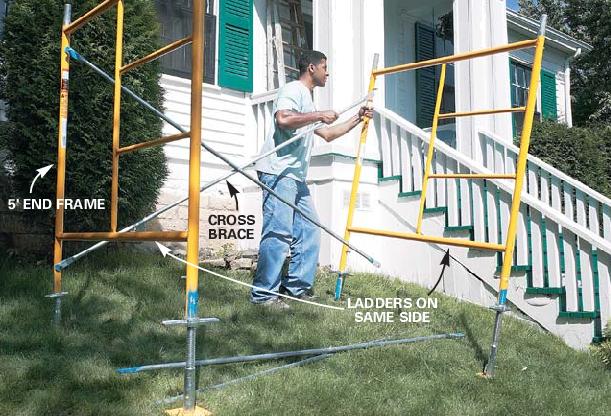
The setup we show is ideal for most projects around the home. It consists
of 5-ft. standard end frames and cross braces to make a 7-ft. long scaffold.
In addition to base plates and a guardrail system, the main components of a
scaffolding system are the frames and cross braces that you stack and combine
end to end to make larger scaffolds. The most common frame size is 5 ft. wide
and 5 ft. tall, but other sizes are available depending on your needs.
The distance between frames is determined by the length of the cross braces,
7- and 10-ft being the most common and economical. Rent adjusting screws and
base plates for easy leveling on uneven ground (Photo 1). Rent casters if you
plan to move the scaffolding. Top the frames with three 7-ft. planks and a
guardrail system. The assembly shown in costs about $85 a week to rent. Adding
another 5-ft. tall section would add about $20 a week. Measure to determine
the ideal platform height for your job. Keep in mind that your working height
is about 4 to 6 ft. above the scaffold planks. The rental salesperson will
help you choose the correct size and style of scaffold for your task.
I’d recommend limiting the height to two sections. After that, stability
becomes an issue and you have to take special precautions. Once the height
exceeds three times the minimum width of the tower, you must tie the scaffolding
to the building at specific intervals. A five ft. wide scaffolding needs to
be tied in when it exceeds 15 ft. high. We won’t cover scaffold tie-ins
in this article. Ask your scaffold-rental specialist for specifics on tie-ins,
if necessary.
Most rental centers will deliver and pick up rented scaffold for an additional
fee. Otherwise you’ll need a pickup truck or trailer.
Start With A Solid Foundation
Even though the basic setup procedure is the same, scaffold hardware varies
slightly from one manufacturer to the next. Ask for manufacturer’s
instructions if your scaffold looks different from that shown here.Photos
1-5show you how to set up the frame and install the planks.
The key to a safe scaffolding is a solid foundation. If the base plates or
casters rest on dirt, grass, asphalt or other soft material, put them on top
of lengths of 2x10 lumber to prevent them from sinking in (Photo 4).We shimmed
the wood pads to level them because we didn’t want to damage the lawn
by digging level spots. But a better method is to level a spot with a shovel
before placing the 2x10 blocks. Never set the scaffolding on loose fill, snow
or next to holes or ditches.
Adjusting screws make leveling the scaffolding easy and safe. Never stack
bricks, concrete blocks or scraps of wood under the frame to level it. If your
ground slopes more than about a foot over an 8-ft. distance, rent leg extensions.
Extreme slopes may require the addition of a short scaffold section under one
end of the scaffolding.
Ask Your Rental Agent For Help
Don’t be tempted to save money by using your own ordinary wood planks
for the work surface—they aren’t strong enough. Rent special scaffold
planks to cover the frames from side to side. Then install the guardrail posts
and rails. Rails aren’t required on the side of the scaffolding that
faces the building as long as the scaffolding is within 14 in. of the building.
Our scaffolding didn’t require them, but if you’re working where
people might walk below the scaffold structure, wire on 2x4 toe boards to prevent
tools and materials from falling and injuring someone. Rest the 2x4 boards
upright around the perimeter of the scaffold planks, screw or nail the corners
together and attach them to the base of the guardrail posts with No. 10 wire.
Once the scaffolding is assembled and in place, double-check that it’s
level and resting securely on all four base plates or casters. If it rocks,
readjust one of the screws to stabilize the scaffolding. Use the built-in ladders
to climb the scaffolding. Don’t climb on the cross braces. Recruit a
helper to hand materials and tools up to the platform. If you can't reach,
use a rope and bucket to pull tools to the top.
Casters allow you to move the scaffolding easily without taking it apart
(Photo, above right), but take a few extra precautions:
- Install a special horizontal
brace diagonally between the two outside frames to keep them square. Ask your
supplier about this.
- Never roll the scaffolding with tools, materials or passengers
on the planks.
- Lock the casters before climbing the scaffolding.
- Avoid overhead wires when
moving the scaffolding. You could be electrocuted if you bump power lines.
- Don’t
roll the scaffolding on steep slopes or near ditches or
holes.</ol>
Photos 6-8 show a few of the jobs where scaffold rental really pays
off. If you have an old house that needs tons of repairs, it might be cheaper
in the
long run to purchase a basic scaffold setup. The cost runs about $650 for
one section with base plates and guardrail. Make sure the scaffolding you
buy is
compatible with scaffold from the local rental shop in case you have to rent
additional parts.
Click on image to enlarge
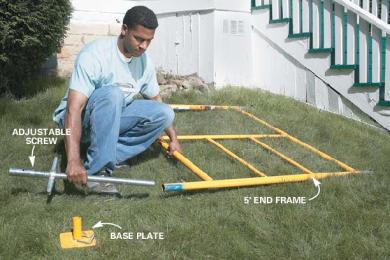
1. Begin assembly by laying two end frames about 7 ft. apart, near your
worksite. Slide on the adjusting screws and base plates or casters now
so you don’t
have to lift the entire scaffolding later to put them in.
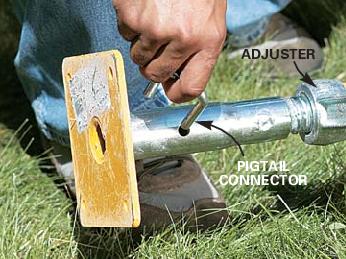
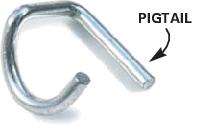
2. Secure the base plates (or optional casters) to the adjusting
screws with the special pigtails or toggle pins supplied. These pigtails
are designed
to lock in place. Use the same connectors to secure the guardrail posts to
the
scaffold frame and connect stacked scaffold frames where they join.
Click on image to enlarge
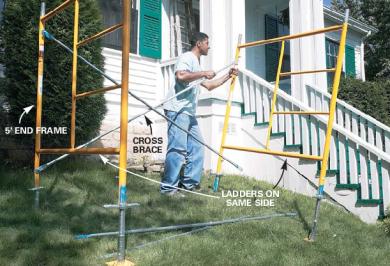
3. Stand one end frame and slide the crossbar ends over the pins. Rest the
cross brace on the ground to temporarily support the first end frame while
you move the other one into position. Tip the second frame up and slip
the opposite end of the cross brace over the pins in the second scaffold
frame.
Complete the frame setup by attaching the second cross brace on the opposite
side.
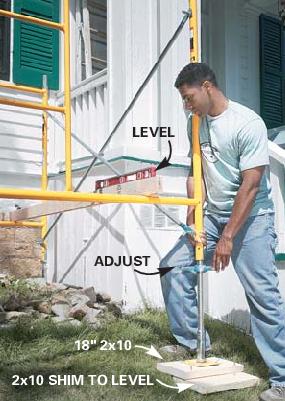
4. Slide the scaffold into position and slip 2x10 lengths of lumber under
each base plate. On sloping ground, level the blocks by shimming under one
side as shown. Level the scaffolding with the adjusting screws.
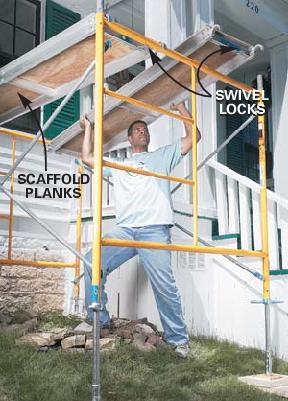
5. Lift the rented scaffold planks from the middle and angle them up through
the frames until both ends are above the frame. Then lower the plank until
the ends hook over the frames. Secure the plank with the swivel catches.
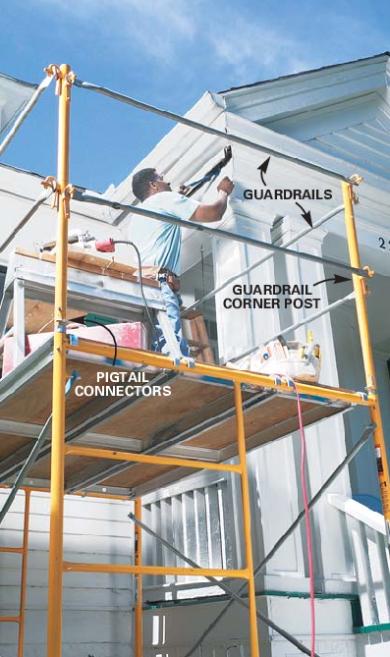
6. Prevent falls by installing a guardrail system. Slide the guardrail posts
over the top of each frame and secure them with a pigtail, toggle pin or
bolt, depending on what was provided with your scaffold components. Install
top and
bottom rails between the posts.
Click on image to enlarge.
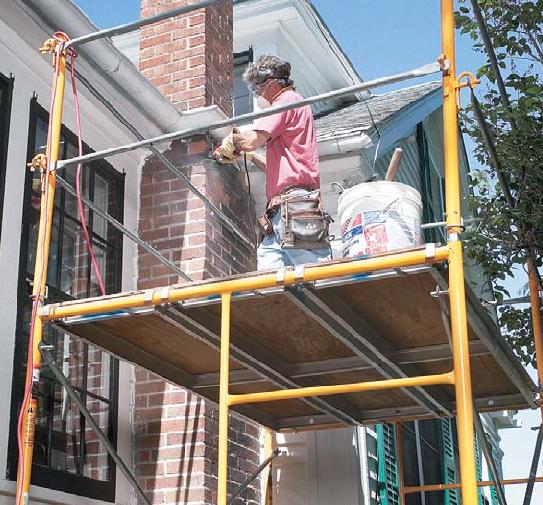
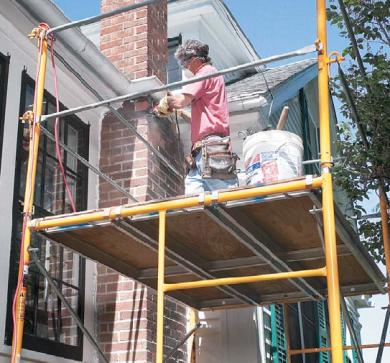
7. Speed up your work by setting up a workstation on your scaffolding. Pull
materials and tools up with a bucket and rope. Major repairs like tuckpointing
a chimney are much easier from a scaffold than a ladder.
CAUTION: Don’t
work around electrical power lines. Watch overhead when moving rolling
scaffolding
to
avoid running into a power line.
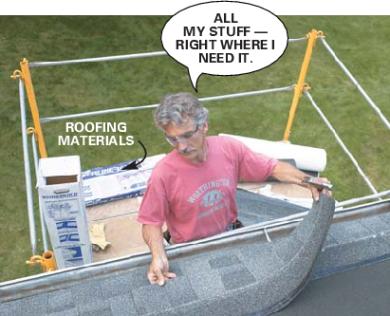
8. Complete the first seven or eight rows of shingles from a scaffold to
avoid having to work from a ladder or lean precariously over the roof edge.
Then nail roof brackets along the eve and install toe boards before climbing
onto the roof. Use locking casters on the scaffolding so you can roll along
the entire roof edge.
|